Hello Optii Users!
Welcome to the enhanced “Add Job” screen! This new view brings almost everything you need for creating a job into one place, making the process much faster and more intuitive. Let’s walk through all its powerful functions.
We've designed it to be easy to follow, so you can add new jobs easily and without hassle. Click on the video below to discover how!
Who is this lesson for?
- Hotel Managers
- Head of Departments
- Optii Champion
Lesson Details:
Format: Video Tutorial
Duration: 7 minutes
Format: Written Lesson
Estimated Reading Time: 5 minutes
What you will learn?
- How to add jobs in the newest view within the Optii platform.
- How to use the newest Optii AI Job Assist in Optii.
Get ready to manage your hotel operations right from the palm of your hand!
Important Note: Contact your customer success manager if you would like to learn more or need further assistance at help@optiisolutions.com
🎥 Click below to watch the tutorial video!
Written Lesson
Accessing the New ‘Add Job’ Screen
1. Choosing the Job Type: at the very top, you’ll see different tabs to specify the category of the job:
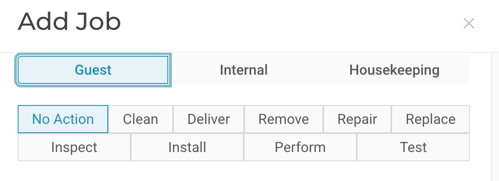
- Guest: Select this for any requests coming directly from a guest.
- Internal: Choose this for jobs related to hotel operations that aren’t guest-specific (e.g., maintenance, deliveries between departments).
- Housekeeping: This tab might be available if your role can initiate specific housekeeping-related tasks directly.
Just below the job type tabs, you’ll see a row of buttons defining the action needed for the job:

- No Action: For informational notes or jobs that don’t involve a physical action.
- Clean: For cleaning tasks.
- Deliver: For delivering items to a location.
- Remove: For removing items.
- Repair: For maintenance or fixing something.
- Replace: For replacing items.
- Inspect: For tasks requiring an inspection.
- Install: For installing new items.
- Perform: For general tasks not covered by other actions.
- Test: For testing equipment or systems.
3. Setting Status and Priority: below the action buttons, you can define the job’s urgency:
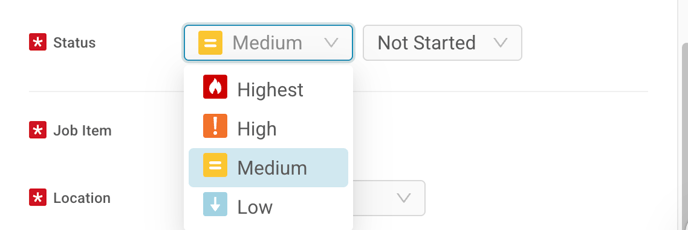
- Status: The default will often be “Not Started.” You can change this if the job is being logged with a different initial status.
- Priority: Use the dropdown (e.g., “Medium” in the screenshot) to set the job’s priority (Highest, High, Medium, Low) based on its urgency.
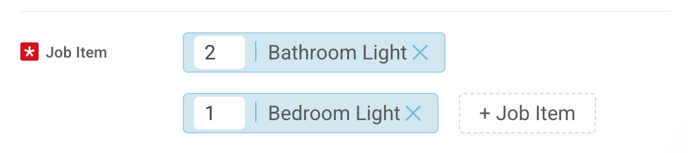
- Job Item: Tap the “Select” button next to “Job Item.” A list of available items will appear. You can usually type to search for an item quickly.
- Quantity: The number next to “Job Item” (e.g., “1" in the screenshot) allows you to adjust the quantity of the item needed for the job.
- + Job Item: If the job involves multiple different items, tap “+ Job Item” to add another line and select an additional item.
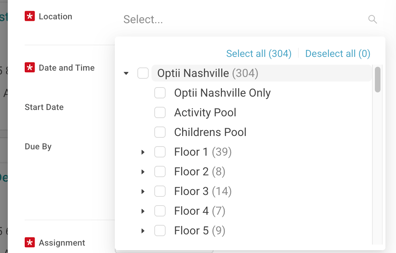
- Location: Tap the “Select...” dropdown next to “Location.” You’ll then be able to search for and select the specific room number, public area, or equipment where the job needs to be performed.

- Date and Time: By default, it will likely show “Does Not Repeat.” If this is a recurring task, you might have options to set up a repeat schedule here (contact your manager if unsure about repeating jobs).
- Start Date / Due By: These calendar fields allow you to set the precise Start Date and Time for the job, and the Due Date and Time by which it must be completed.
- Suggested: You may see a “Suggested” time, which Optii might provide based on typical task durations.
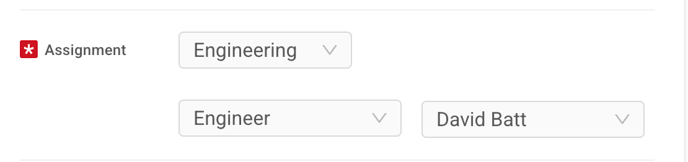
- Department: Select the relevant department for the job.
- Role: Choose the specific role within that department that should handle the job.
- Team Member: Finally, you can select a specific team member to assign the job to. If left blank, it might remain “Unassigned” for someone to pick up.

- Checklist Icon: To add or associate a checklist with the job (if applicable to your role).
- Notes Icon: To add written notes, special instructions, or details for your colleagues.
- Picture Icon: To take and attach a photo directly to the job. This is extremely helpful for visual clarity, especially for maintenance issues!
- Attachment Icon: To attach other files relevant to the job.
🚨If your property is using our newest feature, the Job AI Assist, adding a new job just got even faster and cooler! 😍

How the New AI Job Assist Works in this View:
This new “Add Job” screen works seamlessly with Optii’s AI Assist to speed things up


Picture Recognition: If you use the picture add-on and the AI recognizes the item, it will try to pre-select the “Job Item” for you here.


9. Finalizing the Job (Cancel / Save)
- Cancel: If you decide not to create the job, press “Cancel.”
- Save: Once all details are correct and complete, press “Save” to create the new job.

💡Tip: Feel free to share this valuable resource with your colleagues to explore Optii.