Available with any of the following subscriptions:
- Service
- Housekeeping
- Projects (Preventative Maintenance)
- Guest Messaging
- Above Property Dashboard
Accurately representing your room types is crucial for efficient scheduling and resource management. This article provides a step-by-step guide on how to add or edit room types within your Optii floor plan settings.
Important: Ensure the room type you associate with a room in Optii matches the corresponding PMS room type.
Step 1 Adding a New Room Type:
-
Access Floor Plan Settings: Navigate to "Settings" and select the "Floor Plan" tab in the left-hand menu.

Step 2 Add Room Type
Open Room Types: Click on the "Room Types" tab within the Floor Plan section. This will display all currently saved room types. To add a new one, click the blue "Add Room Type" button.
- Click on the "Room Types" tab on the Floor Plan
- You will see all the current room types saved in the system.
- Click on the "Add Room Type" button in blue to add a new room type.
- Click on the pencil icon next to an existing room type to edit it.

Step 3 Define Room Type Details
Define Room Type Details: For new room types, provide the following information:
-
- Name: A clear and descriptive name for the room type (e.g., "King Suite," "Double Queens," "Ocean View").
- PMS Code: The corresponding code used in your Property Management System (PMS). This is crucial for synchronization.
- Note (Room Type Description): A brief description of the room type, including any relevant details (e.g., "10 pax," "Balcony Setting," "Spa setting").
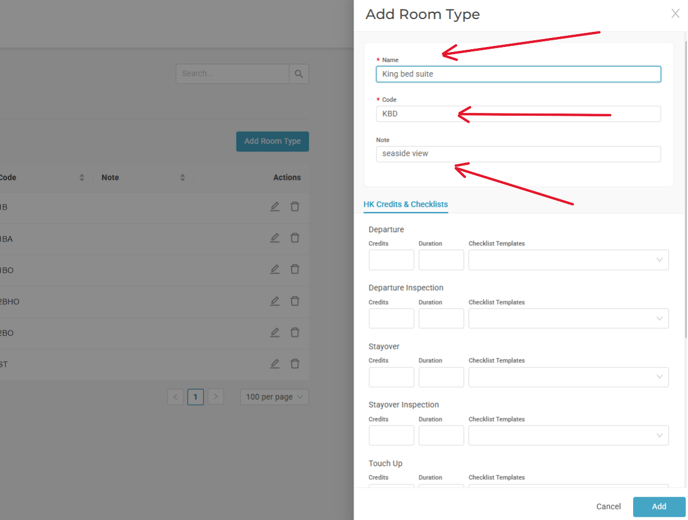
Save New Room Type: Click the blue "Add" button in the bottom right corner. The new room type will now appear in your floor plan and be available for association with specific rooms.

Step 4 Editing an Existing Room Type:
-
Access Floor Plan Settings: As with adding, go to "Settings" and then click on the "Floor Plan" tab.
-
Open Room Types: Click the "Room Types" tab. You'll see the list of existing room types. To edit one, click the pencil icon next to the room type you wish to modify.
-
Modify Room Type Details: Update the name, PMS code, or description as needed.
-
Save Changes: Click the "Update" button (or similar) to save your modifications.

Step 5 Assigning a Room Type to a Room:
-
Select a Room: Click on the desired room number on the floor plan.
-
Edit Room Details: In the room details view that appears on the left-hand side, click the pencil icon.
-
Choose Room Type: Select the appropriate room type (associated with the correct PMS code) from the dropdown menu.
-
Update Room Assignment: Click the blue "Update" button at the bottom of the page to save the room type assignment.

Congratulations! You have successfully learned how to add, edit, and assign room types within your Optii floor plan settings. This will help ensure accurate representation of your hotel floor plan and facilitate effective management.